The Shortcomings Behind Exquisite Artwork
Recently, OpenAI released a new text-to-image model. There are plenty of style transfer examples online, but this article wants to discuss another application scenario that may be more useful for commercial purposes: generating vivid diagrams that can be directly used in slides.
Refined and sophisticated illustrations and visualizations are key to making slides stand out. However, creating an illustration from scratch has a high barrier—if you're not trained in design with an eye for aesthetics and familiar with specialized tools, it’s tough for ordinary people to produce striking visuals. The new GPT model, though, has demonstrated a very fine-grained control over text, accurately and reliably incorporating given text naturally into an image. So if we can combine GPT’s exquisite style with its precise handling of text in image generation, we might solve a huge pain point in business applications and greatly enhance slide presentations.
For example, suppose we want to draw a flowchart. If we create it using the basic PPT approach, it might look like the following figure. It has a few basic modules arranged in a simple linear relationship, connected by arrows.
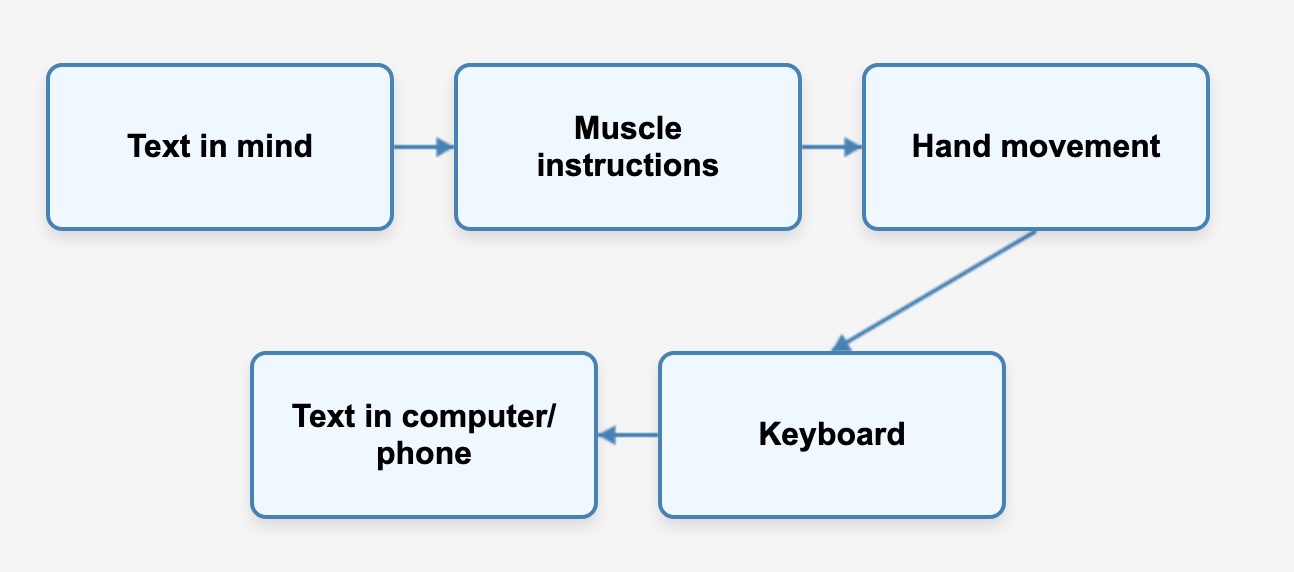
While this simplest form of visualization is easier to understand than a pure bullet list, it’s hard to say it’s very intuitive—fundamentally, it’s still a textual outline. Yet if we truly want to make it more lively, we’ll have to incorporate many design elements. For instance, beyond text, we might add a variety of icons. When the icons become plentiful, we must consider color schemes to keep them pleasant. If we aim even higher, we might want to seamlessly blend it into an exquisite visual scene with some storytelling elements—such as animated characters—to make it more narrative, friendlier, and natural. But it’s clear that while these ideas are great, they’re essentially out of reach for most people. So a natural thought is: can GPT help us achieve something similar and produce effects like the figure below? (Spoiler: the figure below was generated by GPT.)
However, if you actually try it, you’ll find that although GPT’s text control has greatly improved compared to previous models, it’s still not quite controllable enough for truly commercial-grade applications. For example, if we use prompts like the following:
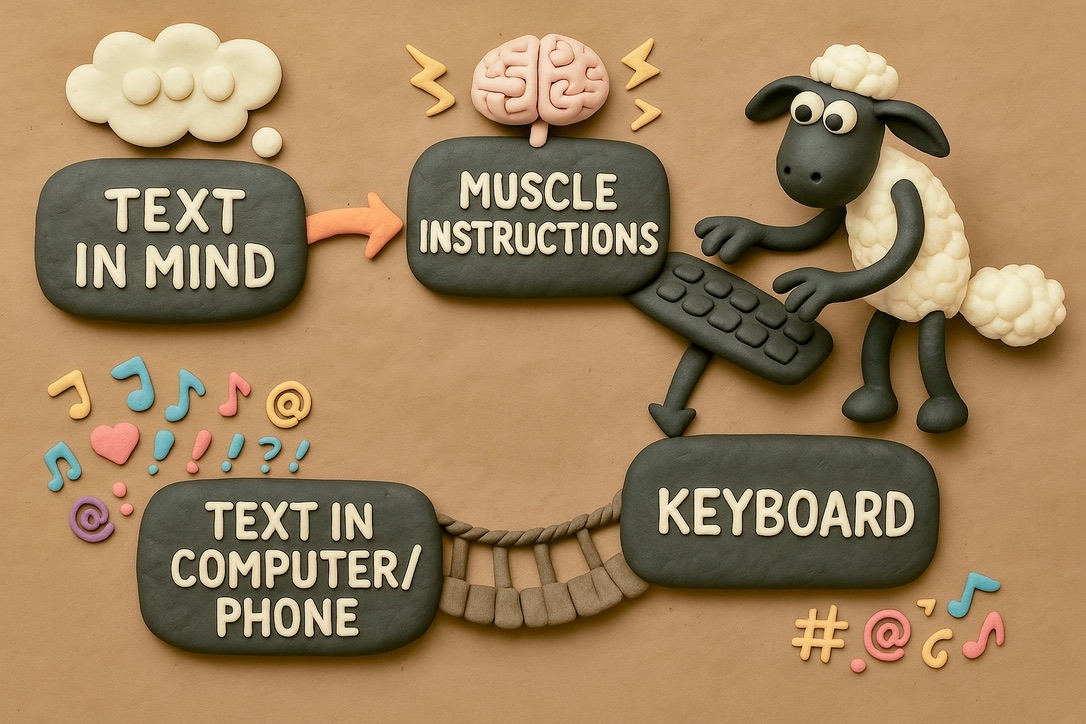
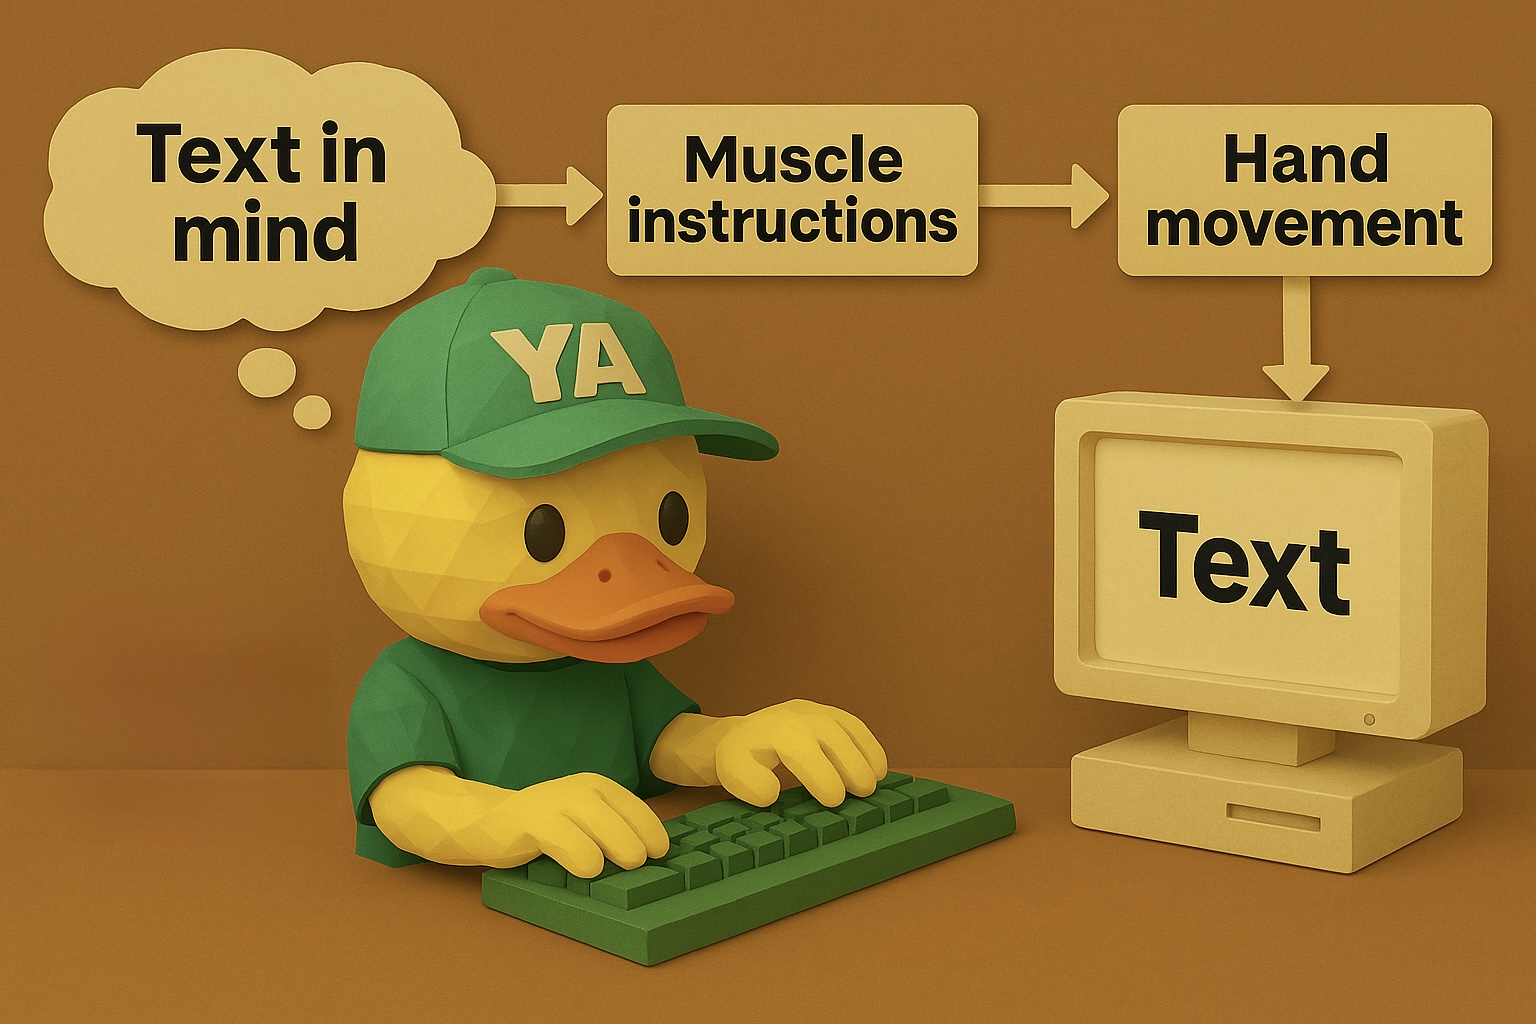
I want to generate a chart in the style of "Shaun the Sheep." It will essentially look like a path in the order of:

Text in mind -> Muscle instructions -> Hand movement -> Keyboard -> Text in computer/phone

In order! And there are arrows connecting each element.
We can indeed get the correct text, but almost every time, there are various issues with the diagram. As shown below, maybe the arrows are wrong, maybe the order is off, or sometimes there are terrifying artifacts.

The main goal of this article is to share my experience—introducing how to elevate GPT’s flowchart and visualization capabilities to a genuinely commercial-grade level with four steps.
Four Steps for Precision and Control at a Commercial Level
1. Use Visuals to Activate AI Thinking
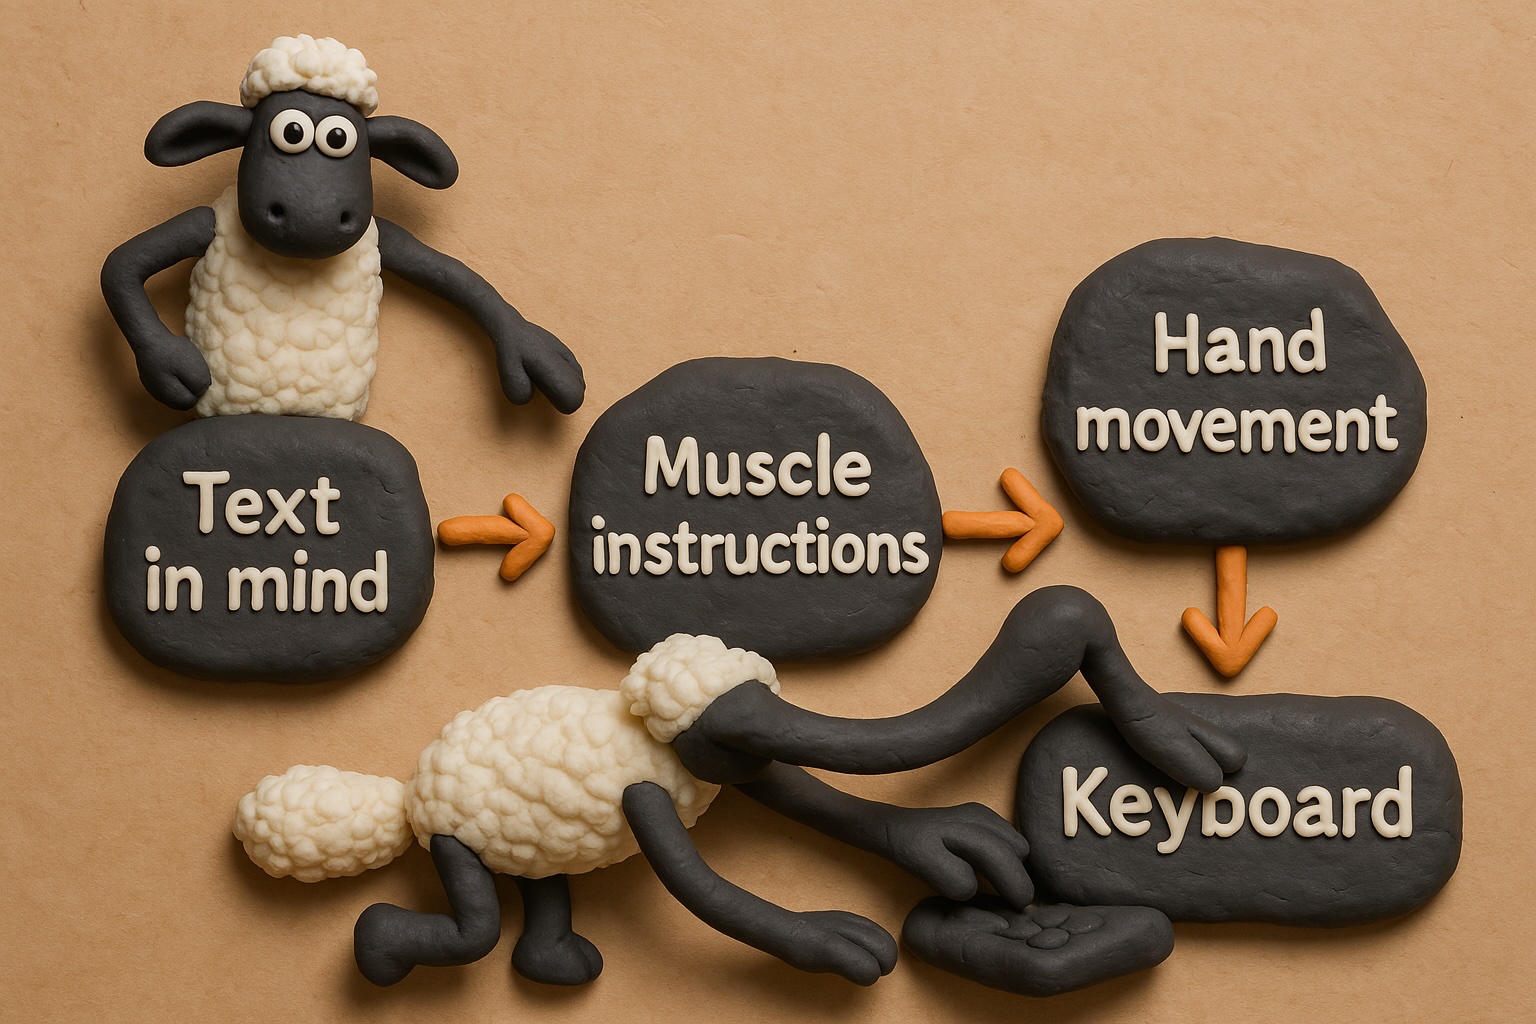
Of these four steps, the first (and perhaps most crucial) principle is that one picture is worth a thousand words. Keep in mind that GPT, as a multimodal LLM, doesn’t just accept text prompts—it can also accept one or even multiple images to guide its image generation. Often, the reason a model’s output is poor is because we haven’t provided it with enough information. Just as with hallucinations in text, the same issue arises in generating images. For instance, in the above prompt, we never explicitly stated that there is no connection between “Text in the Mind” and “Hand movement.” So it’s not entirely unreasonable that the model connected them.
Sure, one could argue that if the model is smart enough, it wouldn’t make such mistakes. That’s true. But on the one hand, the model will always have its boundaries; there will always be scenarios where it’s not smart enough. On the other hand, we actually have a simple way to eliminate such misunderstandings: adopting a “visual-first” principle. Don’t rely solely on textual descriptions of your intentions to GPT—make the image itself the core component of your prompt. This process can be very simple. For example, you can directly ask something like “Cursor” to render an HTML representation of the five elements mentioned above (the box-and-arrow visualization) and then take a screenshot of that webpage to include as part of your prompt to GPT. It can then easily generate the correct diagram.
The key here is that an image carries much more information than text. For example, the fact that “Text in the Mind” and “Hand movement” are not connected might be ambiguous in a text description, but if we provide a screenshot, it is crystal clear—there’s no arrow connecting those elements. Using images as prompts essentially saves the model’s cognitive effort by clarifying many possible misunderstandings in a way that’s direct and intuitive for the model. And this clarification process doesn’t even require effort on our part; you just let the text-based AI or a more “clever” AI sketch a diagram for you.
From another perspective, that’s exactly why we humans do visualization in the first place—because humans process images more intuitively and with less mental load than text. The same observation appears to hold true for AI. So if we communicate our creative intentions with AI through images (even simple ones), the output often improves significantly.
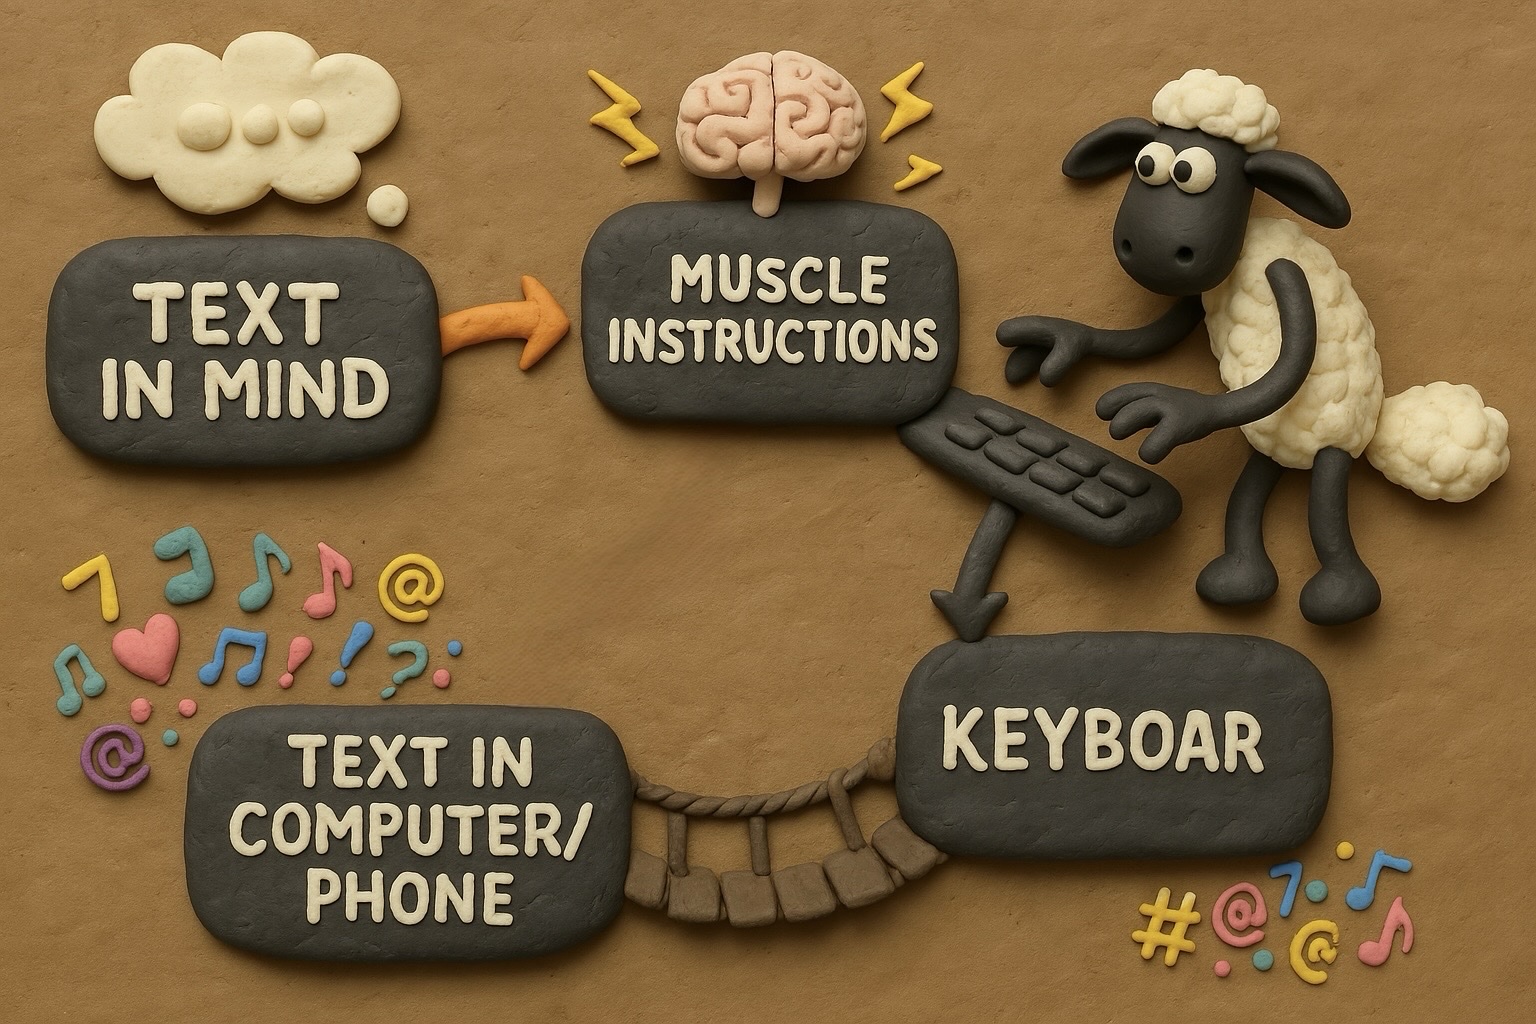
After providing both images and text as our mixed prompts, we might get a result like this:
2. Use Masking for Iterative Generation
In the previous example, we can see there are still some minor flaws in the generated image—for instance, the word “Keyboard” in the bottom right corner is missing a letter. If we try re-generating with the same prompt, it’s equivalent to starting over, wasting previous work and offering no high success rate for fixing that detail. In ComfyUI and MidJourney, partial fixes can be done via local inpainting. ChatGPT also provides this feature, but it’s somewhat hidden. At least for now, neither the desktop client nor the web version includes it. You have to open the generated image in the mobile app, where there’s a “Select” option in the bottom menu. Tap on it to add a mask over a specific area, then continue in the prompt with something like “fix the spelling of ‘Keyboard,’” and it will only modify that part while keeping everything else intact.
This is a huge leap in controllability. However, there’s a minor caveat: Unlike Stable Diffusion or MidJourney, which enforce the mask through a strict computational process, GPT’s masking still seems to be achieved via the LLM. Therefore, you might notice subtle changes outside the masked area, but usually they’re minor and don’t affect the main image.
This greatly impacts our workflow. Now we don’t have to expect the model to get everything right in one go. We can proceed step by step, refining iteratively: first confirm the framework, then modify specific parts, so we can methodically hone the details.
3. Let AI Be Your Creative Partner
The third tip is to leverage GPT’s text-to-text capabilities for brainstorming. This is somewhat similar to the first tip—both aim to minimize ambiguity in prompts. The first tip uses images, while this one involves more detailed text. Often, when we manually type prompts, because we’re lazy or can’t predict AI’s quirks, our instructions can have ambiguities. But if you consult GPT, it can often help fill these gaps or offer better suggestions.
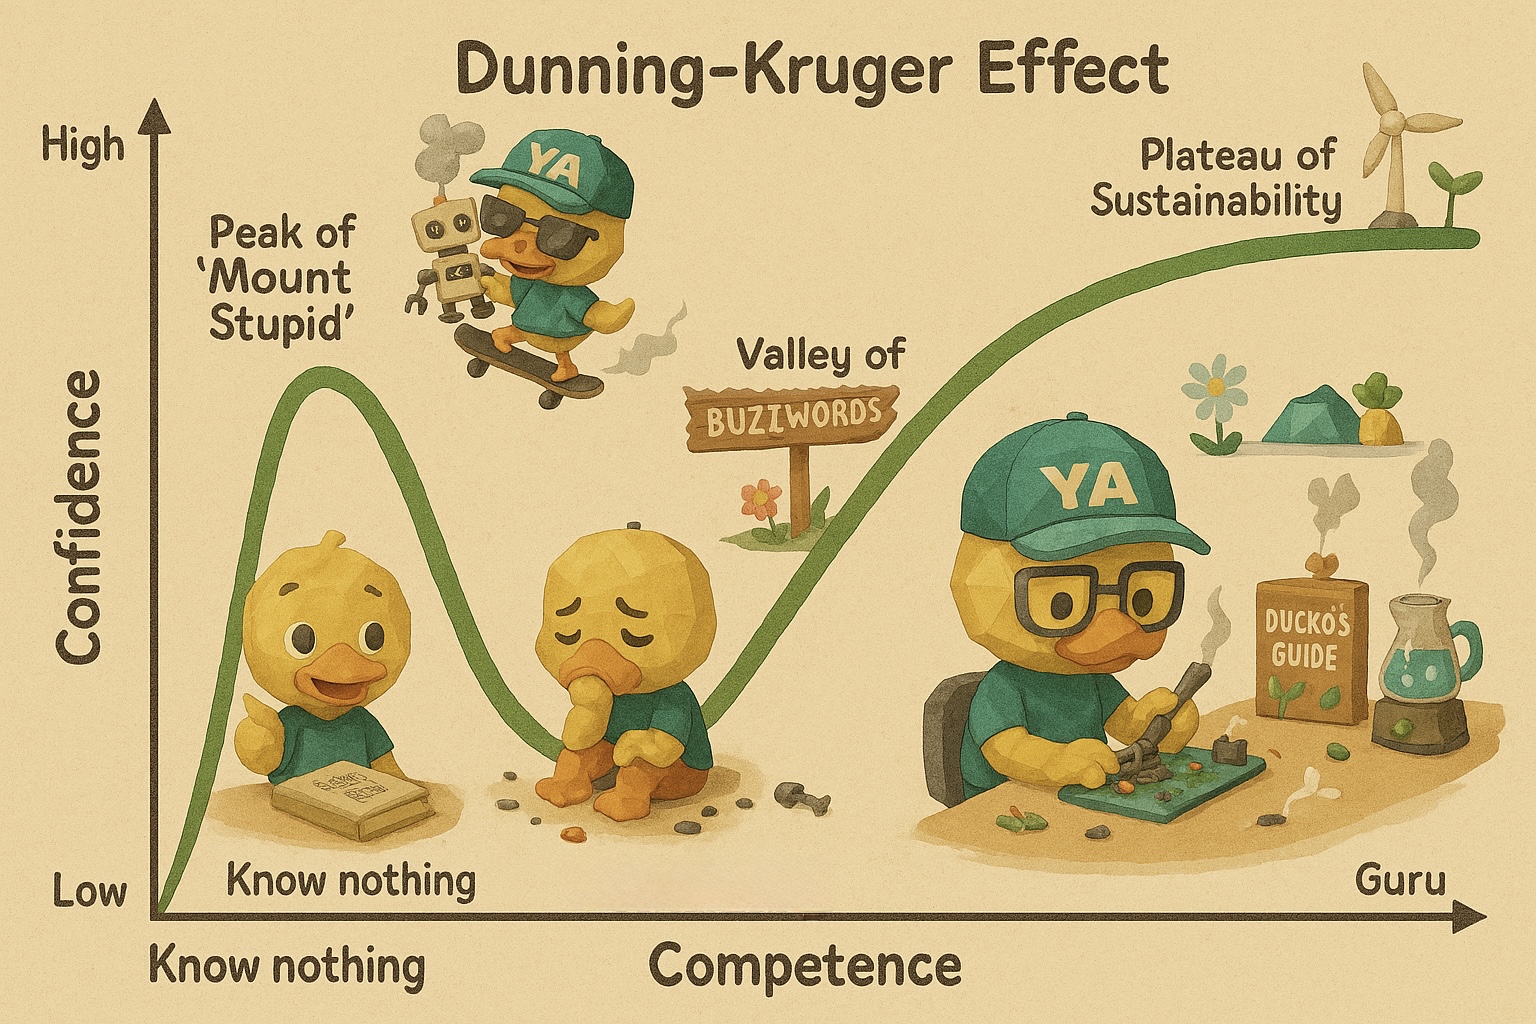
For instance, suppose I want to visualize the “Dunning-Kruger Curve.” Most demonstrations online, as well as my early attempts, simply draw the curve on a blackboard with some animated characters nearby to make it less dull.
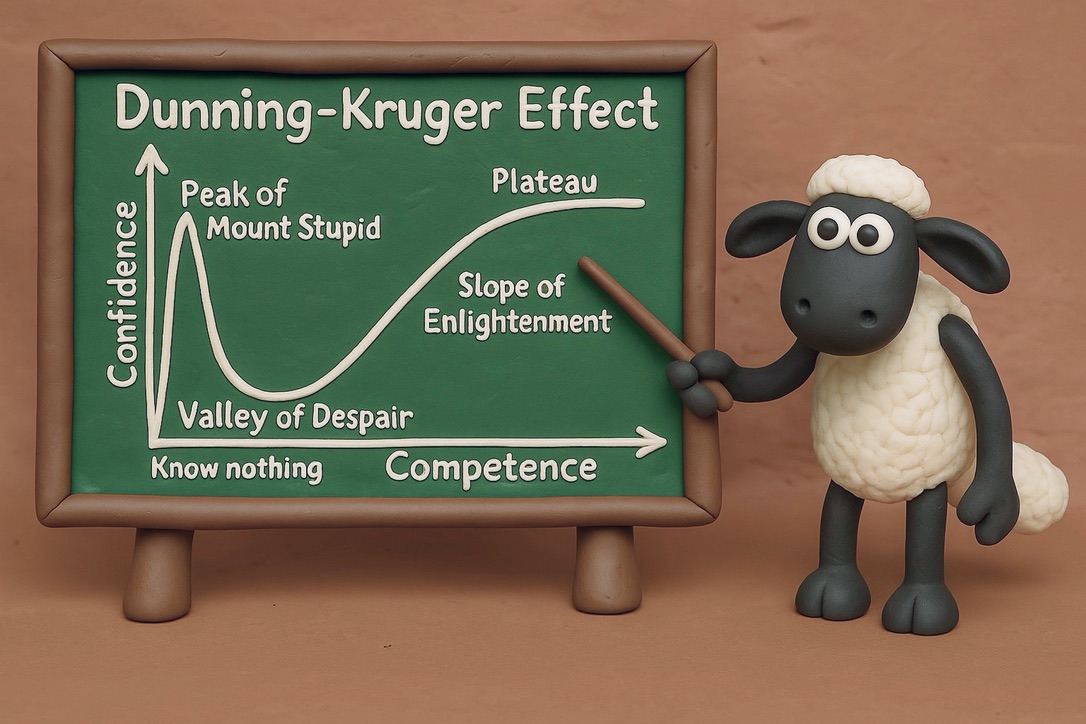
Sure, that’s better than just placing an XY axis in PPT, but it doesn’t fundamentally alter the curve itself; it merely presents it in a friendlier format. A more advanced approach would be to blend visual elements into the curve structure itself, so that it’s no longer just a cold coordinate plane, but tightly integrated with visual characters to convey a story, making it easier to grasp the deeper significance of the curve. However, on the one hand, creating such a concept requires a high level of creativity, and on the other, it entails a lot of typing. So I asked GPT how it might design such a visualization. GPT provided a very detailed response. Then I fed it my own original character “Ducko,” along with some background information, and it generated a highly engaging illustrated image. I believe this image would be another step up from the blackboard example if placed in a slide presentation.
4. Use Document Management to Build an AI Asset Library
This leads naturally to the final tip: document management. We’ve mentioned this concept several times before when discussing programming. If you want to do AI Native Development—be it text-based software development or visual content creation—you need to keep systematic, reusable documentation. Only then can you further deepen and expand on it.
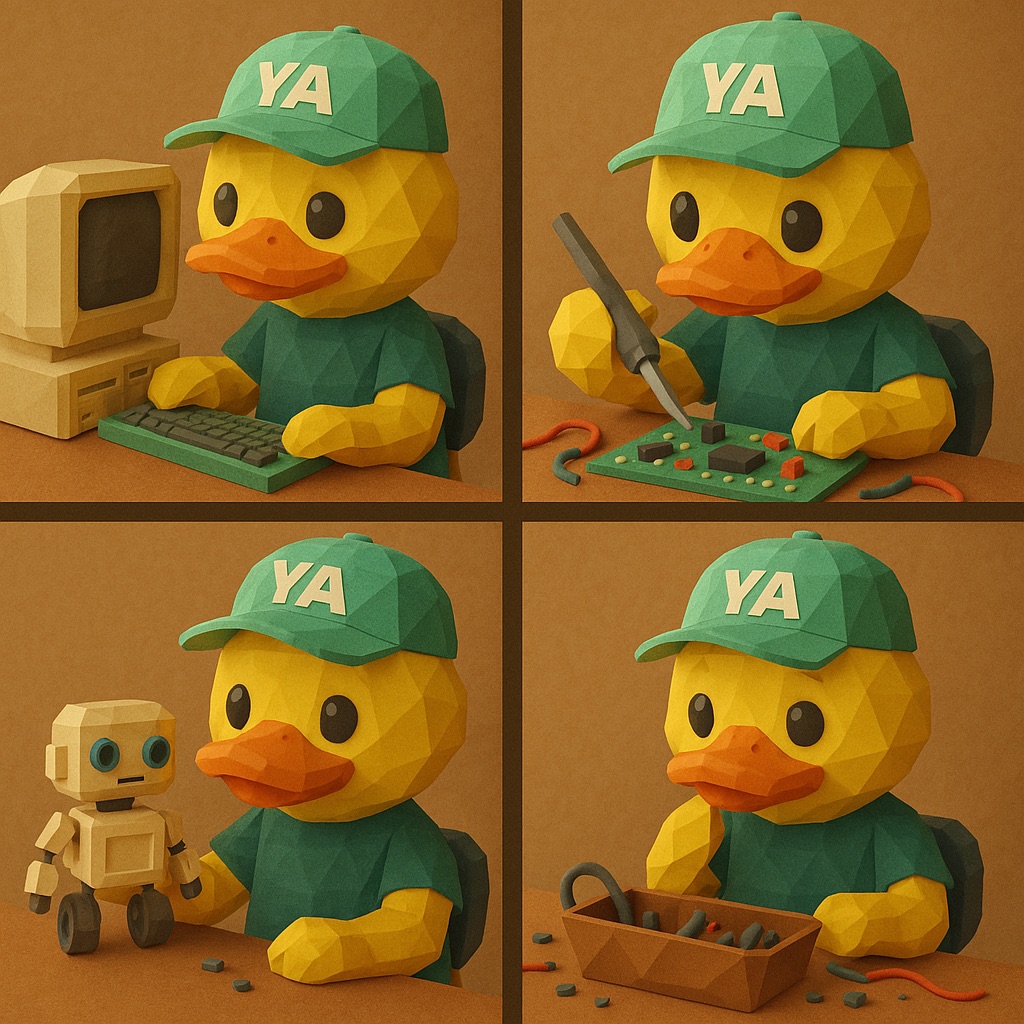
In our case, we can leverage document management to ensure a high degree of consistency in visual elements and style. For instance, for reasons of copyright or corporate branding, we may not be able to use something like “Shaun the Sheep,” and instead need an original character and art style. In such cases, we can first brainstorm with GPT (as in the previous step) about the effect we want to achieve, and then have it generate the character design and visual references we need. Here’s a sample image:
With that in place, we can apply the first and second tips—providing both the text prompt and previously generated character designs and sample images to GPT, so it can create new images with no ambiguity, based on these two elements. Note that both the character design and visual references can be reused and continually improved. Whenever GPT makes a mistake, we can adjust the character design documentation, so that GPT won’t make the same mistake next time. This entire process is what we call document management. With this principle, we can easily generate a unified visual style and incorporate it into our presentations. On the one hand, this makes our message more attractive and easy to understand; on the other, it helps build personal or corporate branding by forming an AI asset library.
Why Do Your Prompt Tips Always Become Obsolete?
After the release of GPT’s text-to-image model, there’s been a sentiment online: “The experience I gained from Stable Diffusion and ComfyUI no longer applies, and many related startups are doomed.” But looking at our discussion above, there’s no need to be so pessimistic.
If, in using SD or other open-source models, all you did was memorize mechanical fixes—like adding a negative tag when a character has three legs, adding a reference image, or applying local inpainting for incorrect text—then yes, these solutions were merely temporary patches for specific shortcomings of older models. When a new model emerges and fixes some old problems, those patches indeed lose value.
However, looking deeper, the underlying principles of these fixes can still transfer to new models. For instance, we utilized both partial inpainting and reference images to solve GPT-related issues. In fact, precisely because I had experience using SD, I was able to quickly grasp higher-level GPT techniques. The critical point is, after you learn the solutions for SD, do you ask why? Why do some models generate six fingers? Why does local masking increase controllability? Why does providing a reference image reduce ambiguity? How does the model parse textual information and map it onto the canvas? The answers to these questions often point to more universal mechanisms: ambiguous user descriptions, spatial layout details, the model’s handling of text placement, conceptual semantics, etc. These types of insights don’t suddenly become irrelevant when a new model arrives; they can be carried over to the next, more advanced model. In other words, the so-called “tips” that only target an older model’s specific quirks are bound to become outdated, simply because they’re like special screwdrivers for a particular screw. But if you understand why the screw is turned a certain way, how the threads are formed, then switching to a new type of screwdriver is still easy to handle.
Hence the real key is: rather than positioning yourself as a mere User, passively waiting for model upgrades and learning new prompts, you should act as a Builder, continually asking why and accumulating reusable experience and documentation each time a problem is solved. Once you develop this habit of proactive thinking and iteration, you won’t be dragged along by the model’s rapid evolution, perpetually playing catch-up. Instead, you can apply your existing deeper insights to explore new features, taking the initiative to master or even predict future upgrades. That’s the true meaning of being Future-Proof: not betting everything on any specific tool, but possessing enough understanding and methodology to handle potential technological updates and iterations.